Web Statistics
Showing posts with label baking. Show all posts

Monday, August 26, 2019

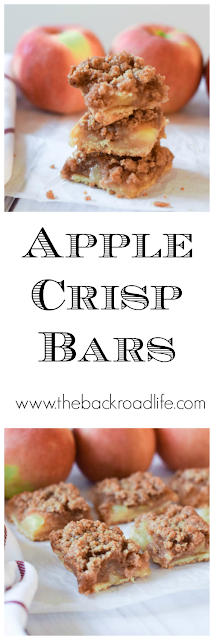
Apple Crisp Bars


Apple Crisp Bars bring together the delicious shortbread crust, juicy and flavorful apple filling, and topped with the crisp cinnamony topping all together in one yummy dessert. Or snack. Or breakfast.

Apple Crisp Bars

Fall is in the air and apple season is here! It is my favorite time of the year; harvest, baking, the sweater weather, the fall colors, of course pumpkins! Just everything. Every year, we make a trip, or a few, to an apple orchard to pick som fresh apples. I love to come home and make tasty treats from them. Plus I have a favorite kitchen gadget I love using to prepare the apples!

Apple crisp is a classic fall recipe that I love to enjoy using our fresh apples. Why not combine the apple crisp with a bar type dessert: Apple Crisp Bars.

Apple Crisp Bars

When baking with apples, it all starts with choosing the right type of apple. Apples are divided into categories of how to use; cooking, baking, or eating. Before heading to the orchard check out my post What Apples Are Best for What Recipes. I like to bake with a tart, but yet sweet apple. The orchard we went to had a new, early variety ready, Zestar, that I choose. It was delicious and crisp.

Apple Crisp Bars Pin


Apple Crisp Bars

Ingredients for Apple Crisp Bars:

Shortbread Crust: 
1/2 cup butter, room temperature
1/4 cup brown sugar, packed
1 tsp vanilla
1 1/4 cup flour

Apple filling: 

4 cups apples, peeled, cored, and thinly sliced (approx.  4 to 5 apples) 
2 Tbsp flour
1/4 cup sugar

Crisp topping: 

1/2 cup brown sugar, packed
1/4 cup sugar
3/4 cup flour
1 tsp cinnamon
1/2 tsp salt
6 Tbsp butter, cold, cut into slices

Directions for Apple Crisp Bars: 

1. In a large mixing bowl or a stand mixer, add the butter and sugar and beat together until fluffy. Add the vanilla and mix together well. Then add the flour and mix together until well combined and is crumbly. 

2. Press the dough evenly into the bottom of an 8x8 pan lined with parchment paper, leaving some hanging out over the sides for later. 

3. Bake the prepared crust at 350 degrees F for 12 to 15 minutes, remove from oven and set aside. 

4. Meanwhile, continue to maintain temperature. 

5. In a medium bowl, mix the prepared apples with the flour and sugar. Mix together well until all apples are coated with the flour/sugar. 

6. Evenly place prepared apples in the pan on top of the baked crust. 

7. In a medium bowl mix together the sugar, brown sugar, flour, cinnamon, and salt. Then using a fork, cut in the butter until the mixture is crumbly. 

8. Spread crumbling topping in an even layer over top of the apple mixture filling. 

9. Bake at 350 degrees for 45 minutes uncovered, or until topping is golden. 

10. Let cool completely. Then lift the apple crisp, using the extra parchment paper on the sides, and cut into square bars. Makes 12 bars. 


OTHER APPLE RECIPE FAVORITES

Apple Cream Pie

Homemade Applesauce

Apple Turnovers

Apple Crisp Bars Pinterest


This post is sponsored by the Glass Barn, Indiana Soybean and Corn Farmers but all thoughts and opinions are my own.

Sunday, August 18, 2019

Pumpkin Streusel Muffins

Easy and delicious Pumpkin Streusel Muffins are the perfect way to bring in the fall season! They are light, moist, and oh so yummy! Flavorful pumpkin muffin with spice streusel crumb and a sweet sugary drizzled topping make up these muffins.

Pumpkin Streusel Muffins

I love the fall season. The vibrant colors, the sweater weather, pumpkins and leaves changing colors, and the yummy flavors that fall brings. All things pumpkin flavored! These pumpkin streusel muffins are perfect for a fall treat!

When fall rolls around, bring on all the pumpkin flavor things! Here are some of my other favorites: Pumpkin Pie here on my blog and Pumpkin Sheet Cake with Cream Cheese Icing from my friend Liz at The Farmwife Cooks.

Pumpkin Streusel Muffins

This Pumpkin Streusel Muffin recipe starts with making the muffin batter. I combine the dry ingredients in a mixing bowl and set aside. Then use my stand mixer to combine the wet ingredients together and mix well. I then add the dry ingredients gradually into the stand mixer bowl and mixed together until the batter is mixed well.

This recipe makes 15 muffins, so you'll need 2 muffin pans with liners. Fill the prepared muffin pan liners with the batter, about 3/4 full. Then make the streusel crumb topping and add it to batter in the muffin liners. Gently press the streusel crumb topping into the muffin batter so it bakes into the muffin.

Pumpkin Streusel Muffins

They are then ready to bake. While the muffins are baking, prepare the optional topping. Once the muffins are cooled from baking, drizzle the icing over each of the muffins.  I love this simple icing topping made from confectioners' sugar, milk, and a little vanilla. It adds just a nice little "extra" to the muffin.

Pumpkin Streusel Muffins

These Pumpkin Streusel Muffins are great for a quick breakfast in the morning or an afternoon snack. Delicious flavor of fall any time of the day!

Pumpkin Streusel Muffins pin

Pumpkin Streusel Muffins

Ingredients for Pumpkin Streusel Muffins 

For the muffins: 
1 3/4 cup flour
1 tsp baking soda
2 tsp cinnamon
1/4 tsp ground ginger
1/4 tsp ground nutmeg
1/4 tsp ground allspice
1/4 tsp ground cloves
1/2 tsp salt
1/2 cup vegetable oil
1/2 cup sugar
1/2 cup brown sugar
1 1/2 cups canned pumpkin puree
2 large eggs
1/4 cup milk

For the crumb topping: 
3/4 cup flour
1/4 cup sugar
1/4 cup brown sugar
1 tsp cinnamon
6 Tbsp butter, melted

Icing (optional): 
1 1/2 confectioner's sugar
1 Tbsp vanilla
2 Tbsp milk

Directions for Pumpkin Streusel Muffins

1. In a large mixing bowl, combine the dry ingredients; flour, baking soda, cinnamon, ginger, nutmeg, allspice, ground cloves, and salt, and whisk together until mixed together well. Set aside.

2. In a medium bowl or a stand mixer, add the oil, sugar, brown sugar, pumpkin puree, eggs, and milk together and stir together until well combined.

3. Add the dry ingredients gradutally to the wet ingredients and mix together until well combined thouroughly.

4. Prepare muffin pan with cupcake liners and spoon the batter into the liners filling them about 3/4 full.

5. Next make the streusel crumb topping by adding the flour, sugar, brown sugar, and cinnamon together in a small mixing bowl and mix together. Add the melted butter and using a fork stir together until crumbs form.

6. Evenly spoon the crumbs on top of the batter and gently press crumbs into the patter so they bake into the muffins.

7. Bake at 425 degrees F for 5 minutes, then reduce oven heat to 350 degrees F and bake for and additional 15 minutes. Test to make sure a toothpick inserted in the center comes out clean.

8. Remove muffins from oven and allow to cool completely (approx. 10 minutes). In the meantime, make the icing for the muffin topping.

9. To make the icing, add the confectioners' sugar, vanilla, and milk together in a bowl and whisk together until well blended. Using a fork drizzle the icing over each of the muffins.

Pumpkin Streusel Muffins pinterest


This post is sponsored by the Glass Barn, Indiana Soybean and Corn Farmers but all thoughts and opinions are my own.


Thursday, May 31, 2018

Red, White, and Blue Cupcakes

If you're looking for patriotic cupcakes for your next party, these Red, White, and Blue Cupcakes are a perfect treat! A great addition to any Memorial Day or 4th of July celebrations.

Patriotic cupcakes for your next party! These homemade red, white, and blue cupcakes are the perfect treat for any summer celebration! Celebrate 4th of July with these amazing cupcakes.

Patriotic cupcakes for your next party! These homemade red, white, and blue cupcakes are the perfect treat for any summer celebration! Celebrate 4th of July with these amazing cupcakes.

Summer brings may opportunities for get-togethers, cookouts, picnics, backyard BBQs, and pot-lucks with celebrations of holidays, birthday parties, family reunions, and the list goes on. My family has a 4th of July/family reunion every year. Each family brings a side dish or dessert to share along with lots of burgers and hot dogs from the grill. There are games for the kids, corn hole, swimming, beer, lots of visiting with family, and lots of food. At the end of the night we light our own fireworks. A fun all-American celebration.

Patriotic cupcakes for your next party! These homemade red, white, and blue cupcakes are the perfect treat for any summer celebration! Celebrate 4th of July with these amazing cupcakes.

As we celebrate America's birthday, a delicious addition of Red, White, and Blue homemade straight from the kitchen is always fitting. These yummy cupcakes are perfect for the dessert table at the get-togethers. These homemade cupcakes are super moist as well as fun red, white, and blue to celebrate America!

Patriotic cupcakes for your next party! These homemade red, white, and blue cupcakes are the perfect treat for any summer celebration! Celebrate 4th of July with these amazing cupcakes.


Patriotic cupcakes for your next party! These homemade red, white, and blue cupcakes are the perfect treat for any summer celebration! Celebrate 4th of July with these amazing cupcakes.


Red, White, and Blue Cupcakes

PRINTABLE RECIPE HERE

Ingredients for Red, White, and Blue Cupcakes

2 1/2 cups flour
2 cups sugar
3 tsp Clabber Girl baking powder
1 tsp salt
1 cup milk
1/2 cup vegetable oil 
1/2 Tbsp vanilla extract
2 large egg whites
1/4 cup water
white frosting (any kind you like, I used Whipped Vanilla)
red and blue food coloring gel
sprinkles and flag cupcake liners ( I used this fun kit)

Directions for Red, White, and Blue Cupcakes

1. Preheat oven to 350 degrees F and prepare cupcake pan with liners.  
2. Add the flour, sugar, Clabber Girl baking powder, and salt to a large mixing bowl or your stand mixer and mix together. Set aside. 
3. In another mixing bowl, add the milk, vegetable oil, vanilla extract, and egg whites and mix together. 
4. Add the wet ingredients to the dry ingredients in the large mixing bowl and combine together until well mixed. Add the water to the batter and mix together on low speed until it is all well combined. 
5. Divide the batter into equal amounts into 3 separate bowls. 
6. Use the red and blue food coloring gel and color 2 of the bowls of batter, to have a red, white, and a blue batter. I used about 2 butter knife tips of food coloring, you can add more to or less for desired color. 
7. Spoon a little of each batter into your cupcake liners, filling about 1/2 full. 
8. Bake for 17 to 20 minutes, or until toothpick comes out clean. 
9. Let the cupcakes cool for a few minutes, then remove them to a cooling rack to finish cooling. 
10. For the frosting, simply use a premade white frosting. Add the frosting to a piping bag. 
11. When the cupcakes are completely cool, pipe the frosting on top of the cupcakes. I used the round piping tip Wilton #12
12. Add sprinkles and other holiday decorations to cupcakes. 

Patriotic cupcakes for your next party! These homemade red, white, and blue cupcakes are the perfect treat for any summer celebration! Celebrate 4th of July with these amazing cupcakes.

Patriotic cupcakes for your next party! These homemade red, white, and blue cupcakes are the perfect treat for any summer celebration! Celebrate 4th of July with these amazing cupcakes.

Patriotic cupcakes for your next party! These homemade red, white, and blue cupcakes are the perfect treat for any summer celebration! Celebrate 4th of July with these amazing cupcakes.
 Patriotic cupcakes for your next party! These homemade red, white, and blue cupcakes are the perfect treat for any summer celebration! Celebrate 4th of July with these amazing cupcakes.

What a fun way to enjoy dessert to celebrate America! 

These can easily be made for graduations by making the batter school colors. 


Enjoy!
Patriotic cupcakes for your next party! These homemade red, white, and blue cupcakes are the perfect treat for any summer celebration! Celebrate 4th of July with these amazing cupcakes.


This post is sponsored by Clabber Girl but my
 thoughts/opinions are always 100% my own


Thursday, November 30, 2017

Dakota Caramels, A Rumford Complete Cookbook Recipe


These Dakota Caramels are a perfect addition to make up as part of your holiday treats.


Growing up, my mom always made a large assortment of holiday treats from baking cookies, making caramels and toffees, and preparing chocolate coated treats. I loved to help her with  them, especially my favorites. We would make up trays of a mixture of all the goodies, and deliver them around to our neighbors. This Dakota Caramels recipe reminds me of  those times making all the holiday treats.


The Dakota Caramels recipe is on page 208 of the Rumford Complete Complete Cookbook. Below is a photo of the recipe.


They have a delicious sweet molasses-nutty flavor to them.

Here is my version of the recipe:


Dakota Caramels, A Rumford Compelete Cookbook Recipe

Ingredients for Dakota Caramels:

2 cups brown sugar
1 cup molasses
1/4 lb grated chocolate (I used semi-sweet)
1/2 cup butter
1 cup milk
1 cup chopped nuts (I used pecans)

Directions for Dakota Caramels:

Put all the ingredients, except the nuts into a large pan. Cook at a medium to high heat to bring mixture to a boil. Stir often and continuously boil to bring mixture to a Firm Ball level, 244 to 248 degrees F, on a candy thermometer . After reaching the firm ball level, add in the chopped nuts and stir them in. Then gently pour the mixture into a greased baking sheet and let cool. Cut into bite sized squares when cooled. Wrap each square in wax paper to store.

PRINTABLE RECIPE HERE


This old fashioned recipe is easy to do and the caramels have a great blend of flavors.


This post is sponsored by Clabber Girl but my
 thoughts/opinions are always 100% my own

.

Saturday, November 4, 2017

Pecan Sandies

Our cookie jar is usually full of a different type of cookie each week! Pecan sandies are one of my favorites, toasty pecan bits combined with a sweet, buttery flavor make up these cookies. A crisp and light cookie that is buttery and loaded with pecans! So good!


These cookies are great for any occasion, to make for a holiday cookie tray, bake sale, or just to fill your cookie jar each week.


Perfect as is straight out of the cookie jar or pair with a glass of milk or cup of tea.


I always like to make a variety of cookies throughout the year, then when the holiday season rolls around, I make them all up at once for cookie trays. These Pecan Sandies will definitely be included!


Pecan Sandies

Ingredients: 
1 3/4 cup flour
1/2 teaspoon Clabber Girl baking soda
1/2 teaspoon cream of tartar
1/2 cup unsalted butter, room temperature
1/2 cup brown sugar
1/2 cup confectioner's sugar
1 teaspoon vanilla
1 egg, beaten
1/4 teaspoon salt
1/2 cup pecans, chopped

Directions:
Mix together the flour, baking soda, and cream of tartar then set aside.

In another bowl, using a hand mixer or stand mixer, cream together the butter and sugars until fluffy.
Then add the vanilla, salt, egg and beat until smooth.

Slowly combine the flour mixture into the liquid mixture. Continue mixing with each flour mixture addition. The dough will be a thick so be sure to add flour mixture a little at a time.

Add the pecans and mix them in with a large spoon.

Roll dough into 1 1/2 inch balls and lay out on an ungreased baking sheet. Using the end of a cup, flatten each dough ball to about 1/2 inch thick.

Bake at 350 degrees for 12 to 15 minutes or until very lightly browned on the edges. Remove and cool.

PRINTABLE RECIPE HERE


Enjoy these Pecan Sandies anytime of the year!


This post is sponsored by Clabber Girl but my
 thoughts/opinions are always 100% my own


Related Posts Plugin for WordPress, Blogger...