Web Statistics

Monday, September 30, 2019

Sweet Potato Fries with Toasted Marshmallow Dipping Sauce

These Sweet Potato Fries are easy to make, baked to slightly crispy, lightly seasoned and paired with a delicious Toasted Marshmallow Dipping Sauce to satisfy your salty and sweet cravings!


We plant sweet potato slips every Spring to harvest fresh sweet potatoes from our garden in the Fall. Any time we can use produce that comes out of the garden, that we've grown ourselves, I love. I sure enjoy that sweet potatoes can be prepared savory and sweet and taste wonderful both ways. For this recipe it is a nice and light mix between the two!


For sweet potato fries, I enjoy a little crisp on the outside and soft on the inside. Baking the sweet potato fries using Clabber Girl Corn Starch, will give you a crispy sweet potato fry that is perfectly crispy on the outside and still soft and flavorful on the inside.

This recipe is easy to make. You simply cut the sweet potatoes into long strips, about 1/4 inch wide. They then are soaked in water for about 30 minutes. This helps them to soften up a little for baking.


The dipping sauce comes together quickly.

Sweet Potato Fries with Toasted Marshmallow Dipping Sauce

PRINTABLE RECIPE HERE

Ingredients for Sweet Potato Fries with Toasted Marshmallow Dipping Sauce

Sweet Potato Fries
2 Sweet Potatoes, peeled
2 Tbsp Olive Oil
1/2 tsp Garlic Powder
1/2 tsp Black Pepper
Fine sea salt, to taste

Toasted Marshmallow Dipping Sauce 

1 bag Large Marshmallows
1/2 cup Heavy Cream
1 tsp Cinnamon 
1 tsp Brown Sugar
1/2 tsp Nutmeg 

Directions for Sweet Potato Fries with Toasted Marshmallow Dipping Sauce

1. Peel and slice the sweet potatoes into long, thin strips. About 1/4 inch wide, so all the strips are evenly cut. 

2. Place the fry strips into a large bowl of water and soak for about 30 minutes. 

3. After the 30 minutes, remove the fries from the water and pat dry with a clean towel. 

4. Add the fries to a medium sized bowl. Drizzle the olive oil over the fries and use a spatula and mix together so all the fries are well coated. 

5. In a separate bowl, add the Clabber Girl Corn Starch, garlic powder, and pepper and whisk together until well blended. 

6. Sprinkle the corn starch mixture over the prepared sweet potato fries and toss so they are all well coated. 

7. Evenly space on a Parchment paper lined baking sheet and place in the oven for 15 minutes at 425 degrees F. 

8. Remove the baking sheet, then using a spatula flip over the sweet potato fries, keeping them evenly spaced. Then place them back in the oven for an additional 15 minutes. 

9. Remove the baking sheet and lightly sprinkle the sweet potato fries with the fine sea salt and let cool for 5 minutes. Serve warm with the Toasted Marshmallow Dipping Sauce.

10. While the fries are baking, is a great time to get the sauce started.

11. Evenly place the large marshmallows on a baking sheet and place in the oven. The same oven temperature is fine. Watch for the marshmallows to become lightly toasted, about 2 minutes.

12. Once the marshmallows are toasted, remove them from the oven.

13. Using a blender, add the heavy cream, marshmallows, cinnamon, brown sugar, and nutmeg and blend together until well mixed and combined.

14. Pour the blended sauce into dipping bowl.

15. Enjoy the Sweet Potato Fries with the Toasted Marshmallow Dipping Sauce.

Recipe notes:
You will want to make the sauce right at the time you are ready to serve the fries, as the sauce will set up after a while.

This is a great snack to enjoy at home or to serve for a pot luck meal. The sweet and salty pairing is so yummy!


Saturday, August 31, 2019

Chicken and Dumplings

Chicken and Dumplings is always a good go to meal that is a family favorite! It is a delicious comfort food meal. Juicy chicken, tender dumplings, in a flavorful broth bring this recipe together for an easy, one pot meal.


Chicken and Dumplings is a great fall and winter meal. So warm and comforting on a chilly day.

This recipe starts with cutting up three chicken breasts into chunks, preparing the onions, carrots, and celery.


Combining the chicken breast chunks together with the chicken broth, vegetables, and seasonings.


While the broth is simmering, prepare the dough for the dumplings. Add the dumpling ingredients into a small mixing bowl. Using a fork, press down on the shortening until it is blended into the mixture.


Next, you'll add the milk just a little at a time to the dumpling mixture. All the milk may not be used, but you will want the dough to be soft and not sticky. Use a fork to gradually mix the milk into the mixture to create the dough.


Then move the dough to a floured surface and knead it a few times. Then using a rolling pin, roll out the dough to about 1/8 inch thick.


The rolled out dumpling dough is then ready to be cut into 1 inch strips. Then cut the strips into 1-2 inch strips to create the dumpling. 


Add the dumplings to the simmering pot and let the simmer and cook for an additional 15 to 20 minutes. 


Chicken and Dumplings 

Ingredients for Chicken and Dumplings

For the soup: 
3 chicken breasts, cut into chunks
1 medium onion, diced
1 cup carrot, julienned
3 stalks celery, thinly sliced
8 cup low sodium chicken stock
2 bayleaf
salt and pepper to taste

4 Tbsp Clabber Girl Corn Starch (optional) 

For the dumplings: 
1 3/4 cups flour, plus extra for dusting when rolling out
1/3 cup shortening 
1/2 tsp Clabber Girl Baking Powder
3/4 cup milk
1/2 tsp salt

Directions for Chicken and Dumplings

1. Using a large stock pot, add the chicken, onions, carrots, celery and season to taste with the salt and pepper. Also add the bayleaves. 

2. Add the chicken stock and bring to a boil. 

3. Reduce the heat, and simmer for 60 minutes or until the chicken is cooked through and tender. 

4. Meanwhile, during the simmering of the broth, prepare the dumplings. 

5. To make the dumplings, add the flour, Clabber Girl Baking Powder, salt, and shortening in a medium mixing bowl. Using a fork, press down on the shortening until it is blended into the mixture. 

6. Add the milk a little at a time. Continue to stir in the milk into the flour mixture until it well combined. You may not use all the milk, so that is ok, just so the dumpling dough is soft but not sticky. 

7. On a floured surface, knead the dough a few times until smooth. 

8. Roll the dough out on a floured surface to roughly 1/8th inch thick. Cut into 1 inch strips, then approximately 1 to 2 inch lengths. 

9. Add the dumplings to the simmering broth. Simmmer for an additional 15 to 20 minutes until the dumplings are cooked and tender. 

10. If you desire the broth to be a little thicker, add 4 Tbsp Clabber Girl Corn Starch with 4 Tbsp water and mix together until well blended.  Then add this mixture gradually to the Chicken and Dumplings and mix in until desired consistency is reached. 


This post is sponsored by Clabber Girl but my
 thoughts/opinions are always 100% my own

Friday, August 30, 2019

Instant Pot Ham and Beans

Instant Pot Ham and Beans is a super easy and delicious comfort food that is perfect for cooler weather. Rich and smoky bean soup mixed with flavorful ham give this savory soup so much flavor! This hearty recipe is the perfect way to use up any leftover ham and a great way to feed a crowd.

Instant Pot Ham and Beans

Do you have any favorite fall recipes?

Ham and Beans just screams fall season to me! It just warms you from the inside out. It is one of my husband's favorite meals to come home to on a chilly day. This recipe is great to make with left over ham. We really love ham, but aren't a huge fan of all kinds left overs. This recipe is a great way to use up left over ham and create a whole new dish with it. Plus this Instant Pot Ham and Beans recipe does taste so so good the second day as the flavors have blended together so much more.

There is no soaking of beans required for this Instant Pot recipe. Simply put all the ingredients in the Instant Pot and let it cook!

Instant Pot Ham and Beans

Instant Pot meals are a great way to bring meals to the table quickly. I know I love mine for easy meal prep.

With this recipe, you simply add everything to the Instant Pot and close and lock the lid. Set the Instant Pot to the Manual function and set the time for 50 minutes. Do a natural release for about 15 minutes. Open the lid and give it a few stirs and it is ready to eat!

While the Ham and Beans is cooking, is a great time to make corn bread to enjoy with and create a complete meal.

Instant Pot Ham and Beans

This Ham and Beans recipe cooks effortlessly in the Instant Pot and gives you all the delicious flavors in just about an hour as it would cooking all day!

Instant Pot Ham and Beans Pin

Instant Pot Ham and Beans 

Ingredients for Instant Pot Ham and Beans

2 lb ham, I used left over ham steak
2 cups pinto beans 
1 small onion, diced 
6 garlic cloves, minced
5 cups chicken stock 
2 bay leaves
1 tsp ground cumin
1/4 tsp dried oregano
salt to taste

Directions for Instant Pot Ham and Beans 

1. Place the ham, onion, garlic, cumin, oregano, bay leaves, and pinto beans in the Instant Pot. 

2. Add the 5 cups chicken stock and stir ingredients around. 

3. Close lid to Instant Pot and lock. Make sure the lid is turned to sealing. 

4. Push the Manual button and set time for 50 minutes. 

5. When time beep goes off, let the Instant Pot do a natural release (about 15 minutes). Then remove lid. 

6. Give the Instant Pot Ham and Beans a few good stirs, and salt to taste. Then it is ready to serve. 

7. Pair it with your favorite cornbread for a complete meal. 

Instant Pot Ham and Beans Pinterest


This post is sponsored by the Glass Barn, Indiana Soybean and Corn Farmers but all thoughts and opinions are my own.

Tuesday, August 27, 2019

Broccoli Salad

This Broccoli Salad is loaded with flavor! The broccoli, bacon, raisins, toasted almonds, tossed with the homemade dressing is delicious in every bite! Such a simple side dish, this Broccoli Salad is a perfect addition to any party, picnic, BBQ, or potluck! It is great by itself for a simple lunch or as wonderful side.

Broccoli Salad

When I go to potlucks, I am always a big fan of all the salads and casseroles that are amongst all the food there. This Broccoli Salad is always a favorite! I would say it is a staple for sure. Even for holidays!

Broccoli Salad

This Broccoli Salad comes together so easily. There is a little bit of prep to get each ingredient ready for the salad, but in no time, this flavorful side dish is ready.

The sweet dressing is simple and just adds the right amount of sweetness to the salad. The combination of mayonnaise, sugar, red wine vinegar, and dill is so light and tasty on the salad.

Broccoli Salad

The almond slices can be toasted easily in the oven for just a few minutes. They will turn a slightly light brown color and it gives them just the right amount of toasted flavor. The almonds add a great amount of crunch and texture to the salad.

For the broccoli, onions, celery, bacon, they need to be cut into small pieces. This just helps get more of all the flavors in each single bite!

Broccoli Salad

Bring everything together in one bowl and mix it all together and this salad is ready to serve! If you love a good Broccoli Salad, you need to try this one! The flavor packed salad is sure to be a hit at any picnic, potluck, or holiday gathering!

Broccoli Salad Pin

Broccoli Salad

PRINTABLE RECIPE HERE

Ingredients for Broccoli Salad

1 cup mayonnaise 
1/3 cup sugar
2 Tbsp red wine vinegar
1/2 tsp dill
2 heads of broccoli, broken down into small florets
1 lb bacon, cooked and chopped into small pieces
1/3 cup toasted almond slices
2 green onions, thinly sliced
1 cup celery, chopped
1 cup raisins

Directions for Broccoli Salad

1. In a small bowl, whisk together the mayonnaise, sugar, red wine vinegar, and dill. Place the dressing in the refrigerator while preparing the rest of the salad. 

2. Prepare the almond slices by toasting them in the oven at 350F for 2-3 minutes. Be sure to watch them as they can burn easily. The almonds are toasted when they are slightly light brown. Simply lay out the almond slices on a small sheet pan to toast them in the oven. 

3. Using a large bowl, combine the broccoli, bacon, toasted almonds, green onions, celery, and raisins together. 

4. Add the dressing to on top of the salad ingredients and stir together until it is all well coated. 

5. Then it is ready to serve. 

Broccoli Salad Pinterest


This post is sponsored by the Glass Barn, Indiana Soybean and Corn Farmers but all thoughts and opinions are my own.

Monday, August 26, 2019

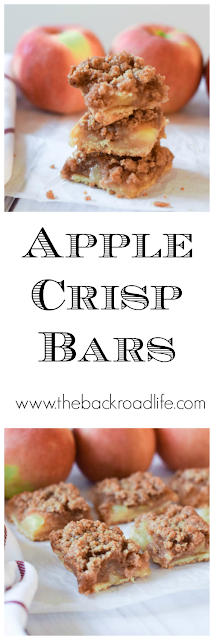
Apple Crisp Bars


Apple Crisp Bars bring together the delicious shortbread crust, juicy and flavorful apple filling, and topped with the crisp cinnamony topping all together in one yummy dessert. Or snack. Or breakfast.

Apple Crisp Bars

Fall is in the air and apple season is here! It is my favorite time of the year; harvest, baking, the sweater weather, the fall colors, of course pumpkins! Just everything. Every year, we make a trip, or a few, to an apple orchard to pick som fresh apples. I love to come home and make tasty treats from them. Plus I have a favorite kitchen gadget I love using to prepare the apples!

Apple crisp is a classic fall recipe that I love to enjoy using our fresh apples. Why not combine the apple crisp with a bar type dessert: Apple Crisp Bars.

Apple Crisp Bars

When baking with apples, it all starts with choosing the right type of apple. Apples are divided into categories of how to use; cooking, baking, or eating. Before heading to the orchard check out my post What Apples Are Best for What Recipes. I like to bake with a tart, but yet sweet apple. The orchard we went to had a new, early variety ready, Zestar, that I choose. It was delicious and crisp.

Apple Crisp Bars Pin


Apple Crisp Bars

Ingredients for Apple Crisp Bars:

Shortbread Crust: 
1/2 cup butter, room temperature
1/4 cup brown sugar, packed
1 tsp vanilla
1 1/4 cup flour

Apple filling: 

4 cups apples, peeled, cored, and thinly sliced (approx.  4 to 5 apples) 
2 Tbsp flour
1/4 cup sugar

Crisp topping: 

1/2 cup brown sugar, packed
1/4 cup sugar
3/4 cup flour
1 tsp cinnamon
1/2 tsp salt
6 Tbsp butter, cold, cut into slices

Directions for Apple Crisp Bars: 

1. In a large mixing bowl or a stand mixer, add the butter and sugar and beat together until fluffy. Add the vanilla and mix together well. Then add the flour and mix together until well combined and is crumbly. 

2. Press the dough evenly into the bottom of an 8x8 pan lined with parchment paper, leaving some hanging out over the sides for later. 

3. Bake the prepared crust at 350 degrees F for 12 to 15 minutes, remove from oven and set aside. 

4. Meanwhile, continue to maintain temperature. 

5. In a medium bowl, mix the prepared apples with the flour and sugar. Mix together well until all apples are coated with the flour/sugar. 

6. Evenly place prepared apples in the pan on top of the baked crust. 

7. In a medium bowl mix together the sugar, brown sugar, flour, cinnamon, and salt. Then using a fork, cut in the butter until the mixture is crumbly. 

8. Spread crumbling topping in an even layer over top of the apple mixture filling. 

9. Bake at 350 degrees for 45 minutes uncovered, or until topping is golden. 

10. Let cool completely. Then lift the apple crisp, using the extra parchment paper on the sides, and cut into square bars. Makes 12 bars. 


OTHER APPLE RECIPE FAVORITES

Apple Cream Pie

Homemade Applesauce

Apple Turnovers

Apple Crisp Bars Pinterest


This post is sponsored by the Glass Barn, Indiana Soybean and Corn Farmers but all thoughts and opinions are my own.

Thursday, August 22, 2019

BLT Pasta Salad

The BLT Pasta Salad is a fun twist on a BLT and a salad! It is the combination of bacon, lettuce, and tomatoes paired with a creamy dressing. This salad is paired with bowtie pasta to give it a fun twist.

BLT Pasta Salad

I love having a BLT sandwich in the summer when I'm craving a light, simple meal. Put it in pasta salad form and you have the BLT Pasta salad!

Every bite of this BLT Pasta Salad makes me think of summer! But even if it isn't summer, it still is oh so good with an explosion of flavor and one that we like to make again and again. I always love a nice fresh salad and also BLT sandwiches. So this is a win win everytime!

BLT Pasta Salad

Use fresh tomatoes and lettuce from the garden if you have it makes for another great meal using garden fresh produce. Or of course make it any time of the year with produce readily available at your local grocery store. Then paired with the homemade dressing that has just a great punch of flavor.

Just so fresh tasting! 

BLT Pasta Salad

This salad is super simple to make and can be ready in just about 15 minutes. Enjoy a light, simple summer salad for lunch or dinner in no time to make.

BLT Pasta Salad

So if you love BLTs, you have to try this delicious summer pasta salad idea....the BLT Pasta Salad! Bacon, lettuce, tomatoes with bowtie pasta and a creamy dressing with a little zip. All your favorite BLT sandwich toppings in a single bowl!

BLT Pasta Salad Pin


BLT Pasta Salad

Ingredients for BLT Pasta Salad

For the dressing: 
3/4 cup mayonnaise
1/4 cup sour cream 
1 Tbsp milk
1/2 tsp pepper
1/4 tsp salt
1/4 tsp garlic powder
1/4 tsp crushed red pepper

For the salad: 
8 oz. bowtie pasta
3-4 cups chopped romaine lettuce
1 pint grape tomatoes - cut in halves
1 1/2 cup shredded cheddar cheese
1 lb bacon, cooked and crumbled

Directions for BLT Pasta Salad 

1. First prepare the dressing for the salad by mixing together all the dressing ingredients and mix together until well combined and smooth. Set aside.

2. Prepare the pasta according to the package in a medium size pan. Drain and transfer to a large salad bowl when the pasta is done cooking. 

3. Meanwhile, prepare the other salad ingredients. chopped lettuce, halved grape tomatoes, cheddar cheese, cooked bacon crumbles. 

4. Add the prepared dressing to the salad ingredients. Toss all the salad ingredients together until everything is evenly coated with the dressing. 

5. Ready to serve.

Try these other pasta salads:

Garden Pasta Salad

BLT Pasta Salad Pinterest


This post is sponsored by the Glass Barn, Indiana Soybean and Corn Farmers but all thoughts and opinions are my own.

Related Posts Plugin for WordPress, Blogger...